
How To Make Petit Fours: A Brief History & Recipes
Perhaps one of the most famous desserts in the French pastry arts is the petit four. These small confectionery morsels can be consumed in one or two bites. They’re usually beautifully decorated, making them immensely popular for cocktail parties, afternoon teas, and brunches.
But where did these tiny pastries come from, and how can you concoct them in your own kitchen? In this article, we talk through how to make petit fours and their rich history.
The History of the Petit Four
The French name “petit four” has nothing at all to do with the number four. The moniker actually comes from the baking method originally used to make these sweet treats. During the 1800s in France, an oven was little more than a large stone cabinet with a fire lit underneath it. Under these circumstances, temperature control was essentially non-existent. As a result, French bakers had only two oven “settings”: blazing hot, and cooling down.
The blazing hot setting was reached when the coals under the oven were burning at maximum capacity. This mode of cooking was referred to in French as “grand four” – translated in English, “big oven” – and was used primarily to cook meats. Once the fire under the stone oven was extinguished, much of the heat was retained. Consequently, it took a very long time for these ovens to cool down. This cooling process, when the oven still retained some latent heat, was referred to as “petit four,” or “small oven.” The trapped heat was just enough to cook tiny, individual pastries.
Eventually, the pastries themselves assumed the name of the type of oven they were cooked in. As baking equipment and technology evolved, the petit four dessert remained a favorite treat throughout France and began to spread across the globe. From Parisian patisseries to bakeries in New York, petit fours are loved around the world today.
Types of Petit Fours
Within the petit fours category come a host of variations. There are the traditional mini cakes as well as many other tiny French desserts that fall under the umbrella of “petit fours.” Here are a few of the different types:
Petits fours sec: These are dry cookies baked at a low temperature for a long time. Popular examples include sable beurre, palmiers, duchesses, and macarons. They might also have a jam, ganache, or dried fruit filling.
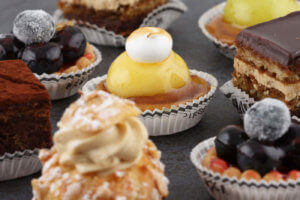
Petits fours glaces: Tiny cakes that are topped with marzipan and then enrobed in either fondant or chocolate. This type of petit four is usually elaborately decorated with intricate piping. These are often the images that come to mind when people think of the traditional petit four.
Petits fours frais: These petits fours are any small pastries that must be eaten the same day they are made because they lose significant quality the longer they sit. Examples include sponge cakes, such as madeleines and financiers, as well as cream-filled pastries like eclairs and tartlets. They are typically moist, hence the need for same-day consumption.
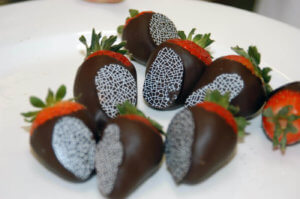
Petits fours deguises: Desserts in this category consist of fresh or dried fruit that is dipped in a sweet coating such as chocolate or cooked sugar. Examples include chocolate covered strawberries or candied citrus fruits.
How to Make Petit Fours
What you choose to do when baking your own petit fours… well, the options there are limitless. You can get fancy with your petit fours, decorating them elaborately, or follow the example of Georges Auguste Escoffier and “above all, make it simple.”
For a basic, relatively easy petit four recipe, try the following beginner-friendly baking steps.
Heat your oven to 350°F. Grease and flour a 13×9-inch baking pan and set it aside. Combine 3 cups all-purpose flour, 1 tablespoon baking powder, and 1/2 teaspoon salt in a bowl. Set it aside as well.
Using an electric mixer with a paddle attachment, beat 1 and 1/2 cups sugar and 1/2 cup softened butter in a bowl at medium speed. Scrape the bowl occasionally, until the mixture becomes creamy. Add 6 egg whites, 1 at a time, beating well after each. Add 1/2 teaspoon almond extract and mix well. Then add the flour mixture alternately with 1 cup milk, beating it at a low speed after each addition just until mixed.
Culinary & Pastry Career Survey
Culinary & Pastry Career Survey
What's your ideal culinary career? Answer 20 simple questions and see if your dream career gets revealed to you.
We’ve compiled of all of the essential questions into one handy guide: Career options, description of skill requirements, and more!

Once the batter is mixed, pour it into your previously prepared pan. Bake it for 30-35 minutes (check the center with a toothpick to see if it comes out clean.) Cool in the pan on a cooling rack for 10 minutes before loosening the cake by running a knife around the inside edge. Carefully remove the cake from the pan and let it cool completely. In order to get the perfect petit fours, trim the edges from the cake and cut it into 48 separate 1 and 1/2-inch square pieces.
To make the icing, combine 3 cups of sugar, 1/4 teaspoon cream of tartar, and 1 and 1/2 cups water in a 3-quart saucepan. Cook it on the stove over medium heat, stirring occasionally for 12-14 minutes or until the mixture comes to a full boil. Cover and let it boil for 3 minutes. Then uncover the saucepan and continue cooking it for 15-20 minutes. Remove it from heat and let it cool to 110°F, for roughly 1 hour. Once cooled, stir in 1 cup powdered sugar, 1 teaspoon almond extract and 3 drops of food coloring as desired. Traditionally, petit fours are iced with vibrant pastels like greens, lavenders, and pinks.
Place your cooling rack over waxed paper. Then take each tiny slice of cake and place it on a fork, drizzling icing over the top and sides. Let the cake pieces stand on the cooling rack until the icing is set. Add any additional garnishes if you wish!
Alternatively, you can use different types of jams and fruit spreads, or melted white chocolate in place of icing. You can add toppings like fruit slices or shredded coconut, drizzle caramel over them — experiment to your heart’s content!
Explore French Cuisine and Pastry Arts
So there you have it: everything you need to know about the petit four. Interested in learning more about the history of specific French dishes or how to make them yourself? Try taking one of our convenient online classes, tailored specifically to the passionate home cook or baker.
And if you’re ready to take your education even further? Browse the degree and diploma offerings, including one specializing in baking and pastry arts, from Auguste Escoffier School of Culinary Arts.
Enjoyed this article? Read these next!
- A History of Spaghetti and Meatballs
- What Spices Are Used in French Cooking?
- Baking Using the Muffin Method
This article was originally published on April 14, 2014, and has since been updated.