
Jamming 101
Jam is one of the many joys that comes out of the warm temperatures, bright sunshine and many rainstorms that bless the summer months. As strawberries, peaches, nectarines and raspberries grow by the plenty and are ripened by the luxurious summer sun, we get boxes upon fruits for practically nothing at their peak textures. There’s seriously nothing like it and if you’re anything like me, it’s actually something you really look forward to all winter long in a super nerdy way.But what can be even better than taking a big bite of a juicy nectarine is smashing and cooking that fruit into beautiful oblivion to make the next best thing to butter. A balance of sweetness, tartness and saltiness gives it that addicting, feel-good flavor that tastes like a vacation and home all at the same time (how does it do that?).
If you were one of the lucky ones who had a mother, grandmother or great grandmother that had one of those canning and jam making top secret recipes that you watched her do time and time again, don’t mind if us others silently judge you from afar. For those where this might be an entirely new concept, we’re gonna walk you through exactly what you have to do to get in on this use of leftover fruit and major supermarket sales. Plus, it’ll be fructose, food dye and nasty additives free! My grandmother used to say that the more love put into it, the better tasting it will be. Whether it’s a small batch or large batch jam making, we’ll show you the science behind the process. What we can’t do is provide the magic, that’s up to you.
Fruit: Before we dive into the fruit, we have to clear one  thing. The thing that makes the cooked fruit thicken into the spreadable happiness that is jam is because of pectin, something found naturally in it. Now that we have that cleared up we can move on to the good stuff. It is said that the more unripe the fruit, the more pectin it contains. Which is great for really thick jam but not so great for sweetness since it’s a little known fact that riper means sweeter. The way to balance this is to have a little bit of both. Our solution is try for half and half. And that’s if you don’t want to use pectin, which you totally can. It’s not necessary for most small batches but can be for the large ones, depending on the type of fruit. Let’s just say it can be your call. This mostly applies to the times you have all the fruit and sugar and salt but not the pectin. Save yourself a trip to the store and just do without. Something else that helps with pectin (and flavor!) is adding some lemon or lemon zest to the mix but we’ll get more into that later. It’s one of those great jam making techniques that can really make or break a batch.
Sugar: Is a completely necessary part of the jam making process. Some say to mash the sugar up with your fruit of choice actually aids in the thickening process. Some think all the enchantments occur in the cooking process. One thing is for sure—you won’t know how much you need until you examine your fruit. If it’s on the riper side, laying off the sugar is probably best. If it’s unripened, go crazy with the stuff. Well, not too crazy. You get what I mean.
Lemon: Helps bring the balance to the jam. The tartness can help balance the strong, sweet flavors that come from the sugar and the fruit mixture. The rind of the lemon also helps add some more pectin to the mixture to aid in the thickening process. All it takes is a little bit of it, more like small slice or some zest to help with both. Some like to squeeze a bit of lemon juice into the mixture and others like to smash up a bit of rind with the fruit and sugar. Whatever you do with it, just don’t forget the lemon!
 Salt: Does what salt usually does in sweets, it kind of ties all of the flavors together and balances it. Same goes for jam.
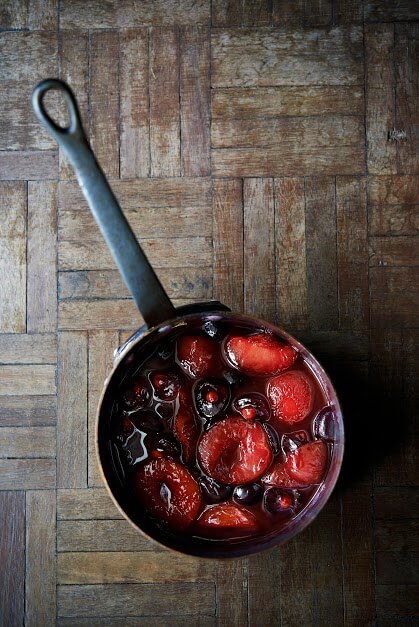
Setting: The best way to test if your jam has set (become thick enough) is by taking a spoon or spatula that has been in the freezer for a while, dipping it in the mixture and seeing how well it holds up. If you can run your finger through the jam on the spoon and it makes a clear path, free of film or watery residue, then you’re in the clear. Get those jars ready, our that sweet goodness in there and enjoy for toast, ice cream, yogurt, peanut butter jelly sandwiches, served up with French cheese and so many more amazing options.
And that’s it! We’ve included a delectable recipe for strawberry jam and a great video tutorial following just shortly. Better yet, why don’t you try it out and tell us how it went! Pointers and tricks are always welcome as well.
Strawberry Jelly Recipe
2 cups sugar
1 each lemon, zested and juiced
1 ½ pints fresh strawberries
1. Hull and cut the strawberries in half.
2. Combine the sugar, lemon zest, and lemon juice in a small saucepan and cook over low heat for about 10 minutes.
3. Add the strawberries and continue to cook over low heat for 20 minutes.
4. Carefully pour into 2 pint canning jars and either seal of refrigerate.